Milk becomes harder to control when it is transferred from its original package into a reusable container. You will learn how to prepare, fill, cool, label, clean, and size a stainless steel container without treating it as a substitute for refrigeration or safe handling.
Key takeaways
- Clean gaskets, valves, threads, and outlet passages before every fill.
- Refrigerate milk promptly and record the fill date and time.
- Leave working headspace instead of filling to the container’s rim.
- Use a measured cleaning and sanitising routine after each use.
Prepare the Container and Milk Before Filling
A stainless steel body is not self-sanitising. Milk fat and protein collect on gaskets, welds, threads, valves, and outlet passages, so prepare every part before filling a hygienic milk storage container.
1. Disassemble the lid, gasket, tap, and outlet where the design permits. Keep small parts together so none returns to service dirty or wet.
2. Wash the vessel and parts with warm water and a food-compatible detergent. Scrub the interior, threads, seams, gasket groove, and fittings with a soft nylon brush; do not use steel wool.
3. Rinse every surface until no detergent remains. Residue can taint milk and interfere with the sanitiser.
4. Sanitise the clean parts according to the chemical label and the container instructions. Follow the stated concentration and contact time, and do not leave bleach, chloride cleaner, or saline residue on stainless steel.
5. Drain the vessel, separate the removable parts, and air-dry everything fully. Trapped water under a gasket or inside an outlet can support microbial growth.
6. Pre-chill the dry container when temperature control matters. An insulated vessel slows warming but does not cool milk; filling a room-temperature container with cold milk uses part of the milk’s temperature margin.
Filter milk after milking or delivery, then cool it promptly before filling. These steps support safer stainless steel milk container uses, including short-term refrigerated storage and controlled transfer.
Fill, Close, Label, and Refrigerate Without Breaking the Cold Chain
Use this sequence to learn how to use stainless steel milk container for milk storage safely:
1. Transfer filtered, already-cold milk from a controlled refrigerated source into the clean, dry container. Leave the manufacturer’s specified headspace so expansion, foaming, and movement do not force milk into the lid or outlet.
2. Close the lid immediately. Keep the container covered during handling; do not leave it open or repeatedly dip utensils into the milk, because each exposure adds contamination risk.
3. Label the container before it enters storage. Record the milk type, source or batch reference, filling date, filling time, and use-by limit.
4. Refrigerate the closed container at 4°C or below, or place it in validated cold-holding equipment. Never allow the milk to exceed 5°C unless a stricter local dairy rule applies. An insulated container slows warming but does not cool milk.
5. Follow the original use-by date and whichever limit is shorter: the applicable regulation or your shop’s written SOP. Moving milk into stainless steel does not restart its shelf life.
Repeated warming and cooling, prolonged room-temperature holding, or an interrupted cold chain requires isolation and a documented safety decision before anyone considers reuse; do not automatically return it to sale or service.
Calculate Working Capacity for a Milk Storage Container for Shops
Place milk according to this calculation: (daily sales volume ÷ planned refills) + only the reserve needed before the next controlled delivery. For example, 18 litres sold daily across four refills requires 4.5 litres per refill; add 0.5 litre only if that reserve is needed before delivery, making the target 5 litres.
A 4500ml stainless steel milk container has a nominal 4.5-litre capacity, not necessarily 4.5 litres of working product. Ask the manufacturer whether 4500ml is measured to the brim and request:
- Working fill level
- Lid clearance
- Outlet geometry
- Required headspace
Example: treat 90% of a 4.5-litre vessel as 4.05 litres only when the manufacturer confirms that fill level is safe for that model. Do not apply 90% to every container. Aarav Enterprises can be included in a comparison, but request these operating dimensions rather than choosing on the 4500ml label alone.
| Option | Benefit | Cost or risk |
|---|---|---|
| One large vessel | Fewer washing and refilling cycles | One batch remains exposed to opening and temperature abuse longer |
| Several smaller vessels | Shorter open-container time and easier portion control | More cleaning, labels, handling, and storage space |
Choose the arrangement that matches sales turnover, planned refills, and the time before the next controlled delivery. A large container is not automatically safer.
Related product
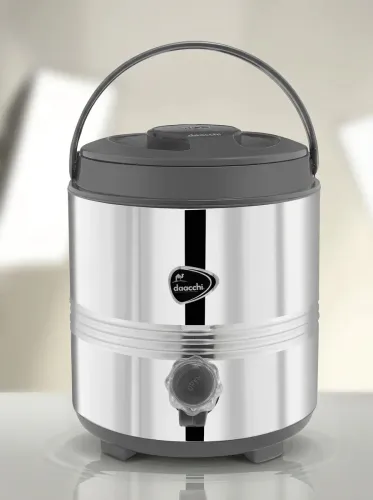
 | Stainless Steel Kettle Stainless Steel Milk Container (4500ml) Stainless Steel Milk Container (4500ml) The Daacchi Stainless Steel Milk Container (4500ml) is a premium-quality storage solution designed for safe,... View product → |
Clean and Sanitise the Container After Every Use
Milk residue left under a gasket or inside a tap can spoil the next fill, even when the outer steel looks bright. A hygienic milk storage container needs cleaning after every use, followed by sanitising when the next fill requires it.
1. Disassemble the lid, gasket, valve, tap, and outlet parts where the design permits. Wash the vessel and parts with warm water and a food-compatible, non-abrasive detergent.
2. Brush the interior, lid underside, gasket groove, threads, welds, valve, tap, and outlet passage with a soft nylon brush. Do not use steel wool, which can scratch stainless steel and leave particles behind.
3. Rinse thoroughly until detergent is gone. Drain the vessel, separate the lid and removable parts, and air-dry everything completely.
4. Inspect by touch, smell, and a lighted visual check. Look for slippery film, white deposits, sour odour, trapped liquid, or damaged seals; a clean appearance alone does not prove cleanliness.
5. Sanitise the clean, visibly soil-free surfaces before the next fill if the container was stored, handled, exposed to contamination, or used for raw milk. Follow the chemical label’s contact time and the container instructions.
Do not leave bleach, chloride cleaner, or saline against stainless steel. Rinse and dry after treatment unless the manufacturer specifies an approved concentration and contact time. If milk curdles, smells sour, produces gas, or leaves a swollen lid, isolate it, discard it under the applicable procedure, then clean and sanitise the container.
Never taste milk to test safety.
Use the Container for Controlled Storage and Dispensing
Suitable stainless steel milk container uses are short-term refrigerated storage, controlled transfer, transport with the lid closed, and dispensing through a clean outlet. Keep it closed between pours. Never pressurise a sealed vessel or connect it to a dispensing system unless the vessel and fittings are designed for that service.
Before relying on the container, verify the complete assembly:
- Confirm 304 or 316 stainless steel, food-contact suitability for the lid, gasket, tap, welds, coatings, and plastic parts.
- Check the surface finish, passivation, crevice-free geometry, drainability, and cleanable fittings. Grade alone does not make a container hygienic.
- Ask for working capacity, required headspace, outlet geometry, cleaning instructions, and chemical compatibility.
A 4500ml stainless steel milk container has a nominal 4.5-litre capacity, not necessarily 4.5 litres of usable milk.
| Feature | Request from the supplier | Why it matters |
|---|---|---|
| Insulation | A test stating starting milk temperature, ambient temperature, elapsed time, opening frequency, and milk temperature | An outside-wall reading cannot prove milk-temperature retention |
| Capacity | Working fill level, brim measurement, lid clearance, and headspace | Prevents foaming, sloshing, spills, and difficult cleaning |
| Food contact | Specifications for every component and cleaning method | A steel body claim does not cover the lid, seal, tap, welds, coatings, or plastic parts |
Treat “double wall” and “premium” as marketing words until these working-capacity, food-contact, cleaning, and insulation details are documented.
Frequently asked questions
How do you prepare a stainless steel milk container before filling?
Wash and sanitise the body, lid, gasket, threads, valve, welds, and outlet passage. Check that every part is clean, intact, and fully dry before filling.
How should you label and refrigerate milk in a stainless steel container?
Close the container securely, record the milk type and fill time, and refrigerate it promptly to protect the cold chain.
How do you calculate the working capacity of a milk storage container for shops?
Start with the stated volume, such as 4,500 ml, then subtract the headspace needed for closing, handling, and safe dispensing. Match the remaining capacity to your sales volume and refill schedule.
How should you clean a stainless steel milk container after use?
Empty it, rinse away milk residue, wash all contact surfaces and fittings, sanitise them, and allow the parts to dry before reassembly.
Keywords